React火了很久了,一直都停留在照葫芦画瓢按照example凑数的基础上,但是如果真的要了解一个框架,它的生命周期和核心API是最重要的部分了,下面我们就来聊聊React的生命周期、核心API的用法以及React工具集,在使用React进行深度开发的时候,一定会事半功倍。本文假设你已经了解了React的基本开发知识,如果不了解,强烈推荐阮老师的这篇《React 入门实例教程》
一、生命周期

1、创建一个类和实例化的基础方法
|
|
2、了解this.state和this.prop
使用过React的人都会知道它有两个属性,state还有props,他们两者都可以作为render中的data输入源,那两者的区别、联系以及正确的用法又是怎么样的呢。参见这篇《props-vs-state》 。
- prop是组件的配置项,是可选的,当组件接收这个参数后它就是不变的。组件改变不了它的props,父组件的props还担当着收集子组件配置项的功能。
- state,在组件初始化的时候会赋予state初始的状态,当组件的状态发生变化的时候,组件内部自行管理着state的变化,所以state可以说是组件的私有值。state参数是可有可无的,但当你的组件是“Stateful Component”的时候你就应该考虑使用state了。
两者在组件变化的时候的状态改变如下:
| - | props | state |
|---|---|---|
| Can get initial value from parent Component? | Yes | Yes |
| Can be changed by parent Component? | Yes | No |
| Can set default values inside Component?* | Yes | Yes |
| Can change inside Component? | No | Yes |
| Can set initial value for child Components? | Yes | Yes |
| Can change in child Components? | Yes | No |
那么两者如何合理的使用和规划呢。举例来说,在官网《thinking-in-react》有这样的一个例子,组件如下图,当需要有过滤和搜索功能的时候,其实组件就是一个“具有状态的组件”了,需要有state管理对应的状态。通过分析,我们可以得到对应的变量规划:
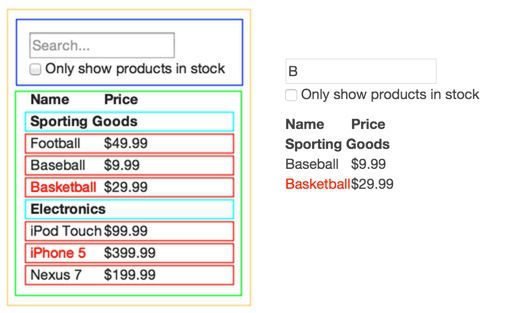
- 用于表示所有产品列表的 products
- 用于表示过滤后的列表 (filterProducts)
- 表示是否使用过滤的功能(checkValue)
- 使用搜索过滤的关键词(searchValue)
要分析变量是否是state,主要考虑这几个问题:
- 变量是否会通过父组件传递参数,如果是,那么它肯定不是state,这里products 肯定不是state
- 变量是否会出现变化,如果不会出现变化,那么它肯定不是state
- 你会不会根其他的state或者props计算这个值,如果是经过计算得到的,那么它一定不是state,由此可见filterProducts也不是state
再考虑 checkValue和 searchValue在本质上是随组件内部改变的,所以,这两个变量应该作为state管理。所以最后的程序如下
See the Pen React filter list demo by zhangmeng (@zhangmeng712) on CodePen.
3、生命周期详情分析
1) 初始化阶段
- getDefaultProps
- getInitialState
- propTypes
- Mixins
- statics
- displayName
getDefaultProps初始化参数使用,当组件类被创建的时候会被调用一次。输入为函数类型,返回object为this.props的初始化值,当父组件没有指定具体参数的时候,参数会在这个方法中被详细映射,此外 为了增加程序的可读性和容错性,建议在这个方法中指定好参数的初始值。
|
|
getInitialState初始化state使用,在组件mount之前被调用一次。输入为函数,返回object为this.state的初始化值。
propTypes用于属性的验证使用,输入为object。如果输入的类型和验证中设置的类型不符,在dev环境会给出提示。除了React内置的类型如 React.PropTypes.array,还支持自定义类型,详情见Reusable Components.
|
|

Mixins
- 定义在其内部的方法会优先于类上的方法执行
- 在Mixins中和类上同时定义render方法会抛出异常(Uncaught Error: Invariant Violation: ReactClassInterface: You are attempting to define
renderon your component more than once) - 在Mixins数组中定义同样名称的非生命周期方法也会抛出异常(Uncaught Error: Invariant Violation: ReactClassInterface: You are attempting to define
logFuncon your component more than once. )
|
|
statics类上的静态方法,可以在实例化之前被类自己调用。
displayName用于在调试信息中标示组件,JSX会自动的设置它的值
2) Mounting阶段
- componentWillMount
- componentDidMount
componentWillMount只会被调用一次。运行于初始化之后,render方法之前。当在此函数中调用setState后,render会显示被修改的state内容,注意,尽管state内容被改变了,但是不会再多次调用render。
componentDidMount在render执行之后被调用,这个方法只会被调用一次。在这个方法中,可以通过React.findDOMNode(this)对组件的dom元素进行操作,子组件的componentDidMount方法会优先于父组件的componentDidMount方法被调用。我们会在这个方法中执行ajax请求或者调用timer或者用其他类库进行交互。
|
|
3) 数据更新阶段
- componentWillReceiveProps
- shouldComponentUpdate
- componentWillUpdate
- componentDidUpdate
componentWillReceiveProps当新的props参数被发现时,就会调用这个方法,普通的render之后是不调用这个函数的。改变之前的props参数可以通过 this.props获得,新的参数可以通过第一个入参获得。在这个方法中调用setState不会触发额外的render调用。
|
|
shouldComponentUpdate当props和state变化后被触发,初次render和强制更新的时候此方法不会被调用。当你希望某个props或者state的值改变的时候,不需要render被再次执行,就可以在shouldComponentUpdate中return false来实现,而此时接下来的 componentWillUpdate 和componentDidUpdate也不会执行。默认shouldComponentUpdate会自动返回true,但是你可以通过比较参数的变化来重写这个函数,如下:
|
|
componentWillUpdate判断完是否能调用render之后,就会执行componentWillUpdate,这个函数是用作render之前发生更新的改变。在这个方法中不能使用setState方法,如果要更新state,在componentWillReceiveProps函数中进行处理。
componentDidUpdate当参数变更完成,render执行完成DOM完全被更新之后会触发,可用于操作新更新的DOM元素,入参为 prevProps和 prevState,以防操作中需要变更前的数据
4) Unmounting阶段
- componentWillUnmount
componentDidUpdate当组件从DOM中销毁的时候调用,可在函数中对timer和不需要的dom元素进行清理
关于组件的生命周期执行顺序和props更新流程等可以参考以下的例子:See the Pen React lifycycle testing by zhangmeng (@zhangmeng712) on CodePen.
二、你应该掌握的API用法
1、常用 API
- React.createClass
- React.render
- React.findDOMNode
- React.createElement:创建一个virtual dom进行渲染,可以使用React.render进行加载
- React.Children: 用于处理组件中的this.props.children
- React.Children.map
- React.Children.only
- React.Children.forEach
- React.Children.count
2 组件相关API
- this.setState:设置state,除了支持key value的传送方式,还支持传入fn, 注意通过上述的描述可以调用它的生命周期方法为:componentDidMount以及componentWillMount(不会触发刷新render,但是可以赋值)。
- this.setProps:设置props
- this.props.children:表示在实例化的时候传入组件的所有子节点,可以通过React.Children来统一处理渲染到页面上
- this.props.refs:render中Dom Node可以用ref来标示,这样就可以利用React.findDOMNode(this.refs.xx)来获取对应的DOM元素了。ref可以传入名称,也可以传入函数更多详情
|
|
3、Add-on API
Animation API:
- ReactCSSTransitionGroup 用于控制动画的标签。
- transitionName 定义动画的class前缀,以下例为基础默认在
标签内新增的的元素,动画效果的className为example-enter example-enter-active;元素被删除时候效果的className为 example-leave example-leave-active - transitionAppear v0.13开始有的方法,用于书写初始化的动画效果,默认是false。注意:一定要先让ReactCSSTransitionGroup这个标签渲染出来,然后再在标签内增加元素,否则效果不生效。
有人在使用这个Add-on的时候遇到了动画时序的问题,也可以使用自定义的动画解决,参考这个例子
<ReactCSSTransitionGroup transitionName="example" transitionAppear={true}>
                  {items}
                  </ReactCSSTransitionGroup>
See the Pen react animtion test by zhangmeng (@zhangmeng712) on CodePen.
Test-Utils API:Test-Utils API: 一般的类库很少提供这种Add-on,更多是通过工具对其进行补充,例如Angular的protractor,以及Polymer的web-componnets-tester,这点React还是想的很全面的,当然它也有对其组件测试的Jest框架,但是通过它的Test-Utils可以结合其它的测试框架进行测试。
- Simulate点击:React.addons.TestUtils.Simulate.click(node);
- 渲染组件:ReactTestUtils.renderIntoDocument(
- );
- 获取组件:findRenderedDOMComponentWithClass
- Mock组件:mockComponent
- 参考实例1:Building robust web apps with React: Part 3, testing with Jasmine
- 参考实例2:测试驱动编写 React 简易计算器
三 组件的拆分和数据的传递
一般来说,稍微复杂的组件可以被拆分成若干组件(拆分本着一个组件只做一件事情的原则,参见Single_responsibility_principle)。合理的组件拆分会让React组件的开发复用性更强,那么在组件中如何管理组件间数据的传递?具体可以参考《How to communicate between React components》这篇文章,讲解的非常详细。
